HVAC ductwork is the least noticeable component of a system and yet it contributes a lot to the overall heating and cooling of the house. Most of the home owners are kept in the dark concerning the fact that a damaged or ineffective duct system can contribute to as much as 30% of loss of conditioned air leading to expensive bills, less comfort and in some instances even worse interior air quality. Overall, with a focused strategy, it is possible to repair any ductwork damage in order to guarantee the proper operation of the heating and cooling system installed in any house.
Understanding Common Ductwork Issues
Knowing what to look for is essential. Here are some typical ductwork issues:
- Leaks at Joints and Seams: These are the most common and occur at connection points where duct sections meet.
- Broken or Cracked Ducts: Result from aging, impact, or poor installation.
- Disconnected Duct Sections: Vibration or shifting can cause ducts to separate, leading to significant air loss.
- Condensation Damage: Ducts in uninsulated spaces can gather condensation, leading to rust and mold over time.
- Poor Insulation: Especially in areas like attics or basements, where temperature differences can cause energy loss.
All of these issues affect the efficiency of the system and result in higher energy bills along with poor temperature control in your house.
Essential Tools and Materials
An effective duct repair requires the right tools and materials. Here’s what you’ll need:
- HVAC foil tape: Durable and heat-resistant, specifically designed for duct sealing.
- Mastic sealant: A thick adhesive paste ideal for larger gaps and long-lasting seals.
- Fiberglass insulation: If your ducts lack insulation, this can prevent future damage.
- Sheet metal screws and clamps: For fastening disconnected duct sections.
- Smoke pencil or incense stick: Helpful for detecting leaks.
- Utility knife and brush: For cutting insulation and cleaning before applying sealants.
Step-by-Step Guide to Repairing HVAC Ductwork
Step 1: Locate and Diagnose Damage
1. Turn Off the System: To work safely, ensure your HVAC system is off before you begin.
2. Inspect for Visual Damage: Check for visible signs such as gaps, tears, and disconnected segments. Pay attention to areas where ducts bend or meet joints, as these are more prone to wear and tear.
3. Use a Smoke Pencil to Identify Leaks: Hold the smoke pencil near potential leak areas and watch for smoke that gets pulled or blown away, indicating an air leak.
Step 2: Seal Minor Leaks Using HVAC Foil Tape
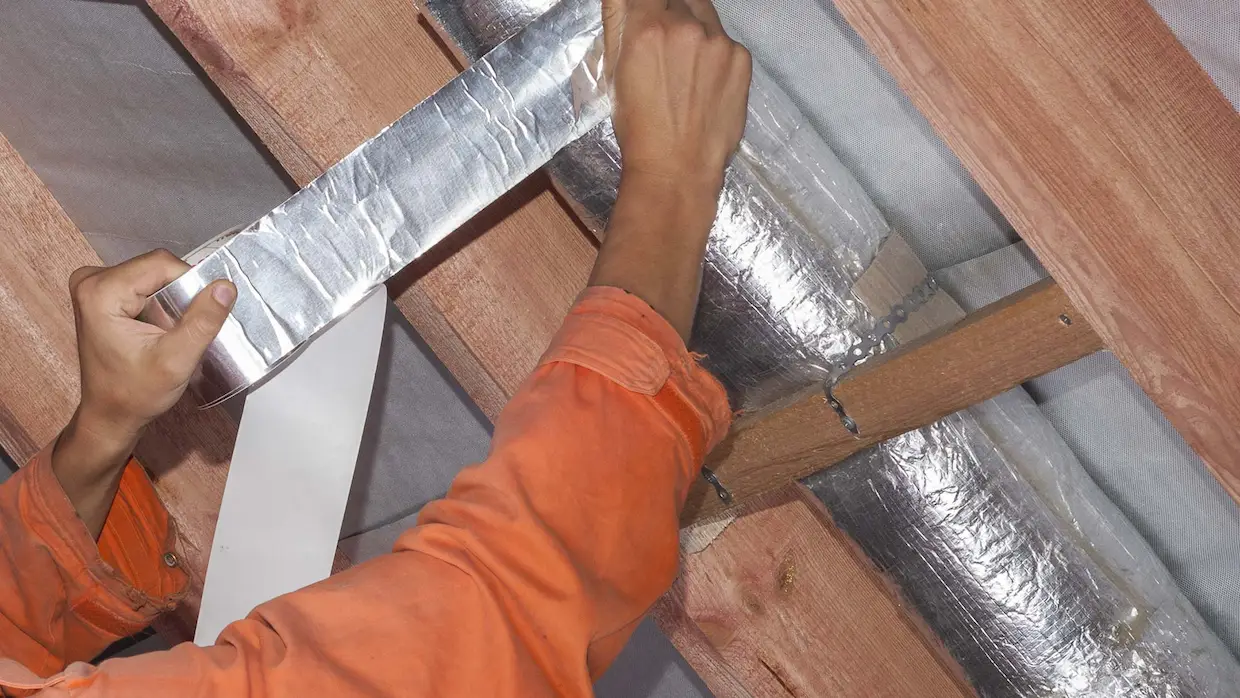
For small leaks at joints or seams, HVAC foil tape is ideal due to its heat-resistant and durable qualities.
- Clean the Surface: Ensure the area around the leak is clean and free of dust, which can prevent proper adhesion.
- Apply Foil Tape Generously: Place the tape directly over the leak, applying pressure to smooth out wrinkles and air bubbles.
- Layer if Necessary: If the area is still leaking after one application, layer a second strip over it to ensure a secure seal.
Note: HVAC foil tape differs from typical duct tape. HVAC tape is specifically designed to handle the temperature and pressure variations within duct systems.
Step 3: Use Mastic Sealant for Larger Leaks and Gaps
Larger leaks or cracks in the ductwork benefit from mastic sealant, a thick paste-like material that provides an airtight seal.
- Apply Mastic with a Brush or Gloved Hands: Using a brush, apply a generous layer of mastic over the gap, spreading evenly to cover the area.
- Add Mesh Reinforcement for Stability: For large gaps or around joints, press mesh tape into the mastic to reinforce it, especially helpful for areas that may shift or flex.
- Allow Time for Drying: Mastic typically requires several hours to dry, so be sure to follow the drying time on the product label.
Step 4: Reinforce and Insulate the Ductwork
Insulating ductwork helps prevent future issues and increases efficiency, especially in unconditioned spaces like attics or basements where temperature differences can lead to condensation and heat loss.
- Wrap with Fiberglass Insulation: Wrap duct insulation around exposed areas and secure it tightly with foil tape.
- Use a Duct Liner for Interior Sections: For sections of ductwork in extreme temperatures, insert a duct liner to prevent condensation and maintain steady airflow.
This insulation will prevent energy loss, help avoid mold and condensation issues, and keep conditioned air at the right temperature as it moves through your home.
Step 5: Reassemble, Secure, and Test the System
Once repairs and insulation are complete, it’s time to reassemble and secure the system.
- Reconnect Loose Duct Sections: Use sheet metal screws and metal clamps to fasten any sections that may have disconnected.
- Seal the Reconnections: Once connected, apply foil tape or mastic to ensure no air leaks at the joint.
- Turn the System on and Test for Leaks Again: Run the HVAC system and check for any lingering issues, running your hand along the repaired areas to feel for airflow.
Maintaining Your Ductwork: Tips for Long-Term Health
After repairs, keeping your ductwork in top condition is essential for maximum efficiency:
- Schedule Regular Inspections: Aim to check your ducts at least once a year or whenever you have maintenance performed on your HVAC system.
- Ensure Proper Insulation in Unconditioned Spaces: Insulate ducts in attics, basements, and crawl spaces to prevent temperature fluctuations and moisture buildup.
- Monitor Energy Bills: A sudden spike can indicate ductwork issues, even if there’s no visible damage.
- Keep Vents Clean and Clear: Blocked or dirty vents can stress the system and affect airflow, indirectly impacting duct health.
When to Call in a Professional
While minor ductwork issues can be DIY-friendly, some problems may require a professional’s expertise. Consider reaching out to an HVAC technician for the following issues:
- Extensive or Inaccessible Damage: If you find extensive rust, mold, or damage in areas that are hard to access.
- Consistent Efficiency Problems: If you continue experiencing high energy bills and uneven temperatures.
- Ductwork Redesigns or Replacements: If your ducts are outdated, a professional can help design an efficient duct system that reduces energy costs and improves airflow.
Conclusion
There are instances whereby repairing the ducting system may change how efficient any HVAC system can operate, and this may change the comfort levels and even the energy saving levels. In fact, the insulation and leak issues can be dealt with and the duct system managed properly as follows. But then again, when the damage is extensive, it is wiser to seek help from a professional for the repairs to be done properly without causing any additional damage.
The infrequent practice of care for the ducts usually leads to the improved effectiveness of the system and a better, healthier and more hospitable, residence. Alter the condition of the ducts and you will differentiate the comfort levels and the bills.
FAQs
How do I know if my ductwork needs repair?
Common signs include inconsistent room temperatures, unusual noises from vents, increased dust, and higher energy bills. You may also feel drafts or notice odors from the vents. If you experience any of these, inspect your ducts or consider a professional assessment.
Can I repair HVAC ductwork myself, or should I hire a professional?
Minor leaks, small gaps, and basic insulation work can often be done DIY. However, extensive damage, rust, mold, or difficult-to-access areas may require a professional to ensure the repairs are effective and safe.
What materials are best for sealing ductwork leaks?
For minor leaks, high-quality HVAC foil tape is durable and easy to apply. Mastic sealant works well for larger gaps and offers a long-lasting solution. Avoid standard duct tape, as it degrades quickly under HVAC conditions.
How often should I inspect my HVAC ductwork?
Ideally, check your ductwork annually or whenever you schedule routine HVAC maintenance. Inspections help catch small issues before they become costly repairs and ensure your HVAC system runs efficiently year-round.
Will sealing and insulating my ductwork reduce my energy bills?
Yes, sealing and insulating ductwork minimizes air leaks, so your HVAC system doesn’t have to work as hard to maintain desired temperatures. This can lower energy consumption, reduce wear on the system, and lead to noticeable energy savings over time.


Leave a Comment